
How to Center a Div in CSS - Simple Methods That Work
Ah, the age-old question: "How do I center a div?" It's become something of a running joke in the web development community, but let's be real - it's a real challenge that we face regularly. Whether you're building a modal, positioning a hero section, or just trying to make your layout look decent, knowing how to center things properly is crucial.
In this article, we'll be going through the different ways to center a div using CSS.
The Classic Approach: Auto Margins
Let's start with the OG method - using auto margins. This is perfect when you just need to center a div horizontally:
.element {
   max-width: fit-content;
   margin-inline: auto;
}
This works by telling the browser to distribute the available space equally on both sides. The key here is setting a width constraint - without it, your element will just take up the full width, and there won't be any space left to distribute.
An example of this is the following:
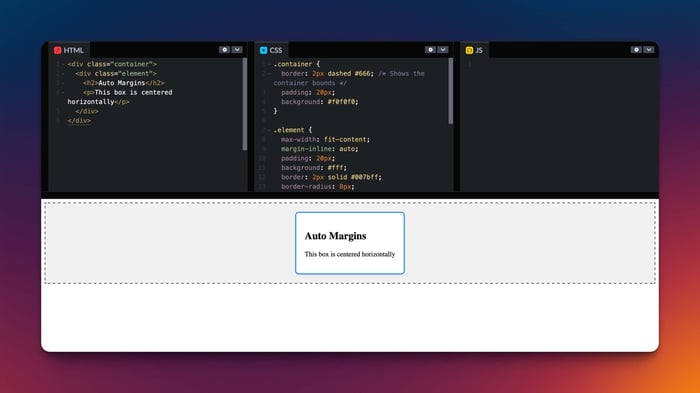
which was achieved with the following code:
<div class="container">
  <div class="element">
    <h2>Auto Margins</h2>
    <p>This box is centered horizontally</p>
  </div>
</div>

<style>
.container {
  border: 2px dashed #666;
  padding: 20px;
  background: #f0f0f0;
}

.element {
  max-width: fit-content;
  margin-inline: auto;
  padding: 20px;
  background: #fff;
  border: 2px solid #007bff;
  border-radius: 8px;
  box-shadow: 0 2px 4px rgba(0,0,0,0.1);
}
</style>
The dashed border shows the container's bounds, while the blue border highlights our centered element.
Flexbox: A modern approach
Flexbox is probably the most versatile solution we have. Want to center something both horizontally and vertically? Here's all you need:
.container {
   display: flex;
   justify-content: center;
   align-items: center;
}
What's great about this approach is that it works with:
- Single or multiple elements
- Unknown sizes
- Overflow scenarios
- Different directions (using flex-direction)
Here's an example for the same:
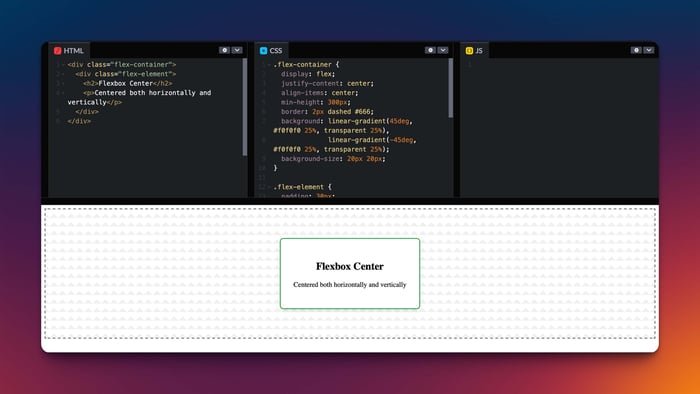
which was achieved with the following code:
<div class="flex-container">
  <div class="flex-element">
    <h2>Flexbox Center</h2>
    <p>Centered both horizontally and vertically</p>
  </div>
</div>

<style>
.flex-container {
  display: flex;
  justify-content: center;
  align-items: center;
  min-height: 300px;
  border: 2px dashed #666;
  background: linear-gradient(45deg, #f0f0f0 25%, transparent 25%),
              linear-gradient(-45deg, #f0f0f0 25%, transparent 25%);
  background-size: 20px 20px;
}

.flex-element {
  padding: 30px;
  background: white;
  border: 2px solid #28a745;
  border-radius: 8px;
  box-shadow: 0 4px 6px rgba(0,0,0,0.1);
  max-width: 300px;
  text-align: center;
}
</style>
The patterned background helps visualize the container's space, while the green border shows our centered element.
Grid: When You Need More Power
CSS Grid offers another approach, and it's surprisingly concise:
.container {
   display: grid;
   place-content: center;
}
Grid really shines when you need to stack multiple elements in the same spot. For example, if you're building a card with overlapping elements, you can do this:
.container {
   display: grid;
   place-content: center;
}

.element {
    grid-row: 1;
    grid-column: 1;
}
All elements with this class will occupy the same grid cell, stacking on top of each other while staying centered.
Here's a visual example on how you can stack centered elements:
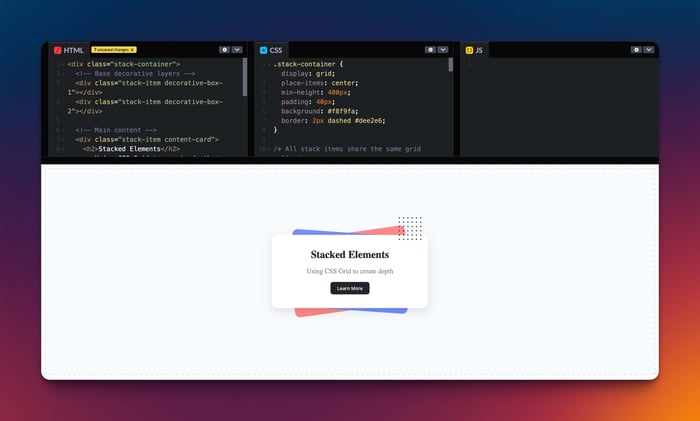
and the code snippet for the same was:
<div class="stack-container">
  <div class="stack-item decorative-box-1"></div>
  <div class="stack-item decorative-box-2"></div>

  <div class="stack-item content-card">
    <h2>Stacked Elements</h2>
    <p>Using CSS Grid to create depth</p>
    <button class="demo-button">Learn More</button>
  </div>

  <div class="stack-item decorative-dots"></div>
</div>

<style>
.stack-container {
  display: grid;
  place-items: center;
  min-height: 400px;
  padding: 40px;
  background: #f8f9fa;
  border: 2px dashed #dee2e6;
}

/* All stack items share the same grid cell */
.stack-item {
  grid-row: 1;
  grid-column: 1;
  border-radius: 12px;
}

.decorative-box-1 {
  width: 280px;
  height: 180px;
  background: #ff8787;
  transform: rotate(-8deg);
}

.decorative-box-2 {
  width: 280px;
  height: 180px;
  background: #748ffc;
  transform: rotate(4deg);
}

.content-card {
  width: 300px;
  padding: 2rem;
  background: white;
  box-shadow: 0 8px 20px rgba(0,0,0,0.1);
  text-align: center;
  z-index: 2;
}

.content-card h2 {
  margin: 0;
  color: #212529;
}

.content-card p {
  color: #868e96;
  margin: 1rem 0;
}

.decorative-dots {
  width: 60px;
  height: 60px;
  background-image: radial-gradient(#212529 20%, transparent 20%);
  background-size: 10px 10px;
  transform: translate(140px, -100px);
  z-index: 3;
}

.demo-button {
  background: #212529;
  color: white;
  border: none;
  padding: 8px 16px;
  border-radius: 6px;
  cursor: pointer;
  transition: transform 0.2s;
}

.demo-button:hover {
  transform: translateY(-2px);
}
</style>
This example demonstrates several key concepts:
- All elements share the same grid cell (1/1)
- Z-index controls the stacking order
- The main content stays perfectly centered
The dashed border shows the grid container bounds, while the layered cards and decorative elements show how multiple items can be stacked and positioned within the same grid cell.
Positioning for UI Elements
When you're building modals, tooltips, or floating UI elements, absolute/fixed positioning might be your best bet:
.modal {
  position: fixed;
  inset: 0;
  width: fit-content;
  height: fit-content;
  margin: auto;
}
This approach is great because:
- It works regardless of the page scroll position
- The element can have dynamic dimensions
- You can easily add padding around it
- It won't affect other elements' layout
Here is a modal example:
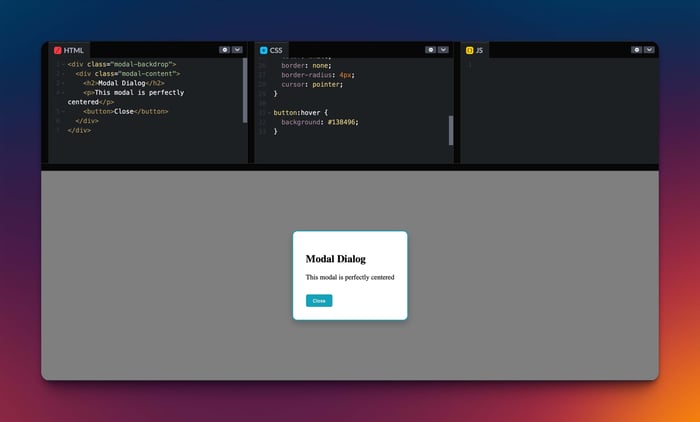
and the code for the same:
<div class="modal-backdrop">
  <div class="modal-content">
    <h2>Modal Dialog</h2>
    <p>This modal is perfectly centered</p>
    <button>Close</button>
  </div>
</div>

<style>
.modal-backdrop {
  position: fixed;
  inset: 0;
  background: rgba(0, 0, 0, 0.5);
  display: grid;
  place-items: center;
  padding: 20px;
}

.modal-content {
  position: relative;
  width: fit-content;
  max-width: 400px;
  padding: 30px;
  background: white;
  border-radius: 12px;
  box-shadow: 0 8px 16px rgba(0,0,0,0.2);
  border: 2px solid #17a2b8;
}

button {
  margin-top: 15px;
  padding: 8px 16px;
  background: #17a2b8;
  color: white;
  border: none;
  border-radius: 4px;
  cursor: pointer;
}

button:hover {
  background: #138496;
}
</style>
The semi-transparent backdrop helps focus attention on the modal, while the teal border defines the modal boundaries.
Text Centering: It's not what you think
Remember that centering text is its own thing. You can't use Flexbox or Grid to center individual characters - you need text-align:
.text-container {
    text-align: center;
}
Which one to use?
Here's a quick decision guide to help you choose the best method to center a div:
- Just horizontal centering? → Auto margins
- Floating UI (modals, popups)? → Fixed positioning
- Stacking elements on top of each other? → Grid
- Everything else? → Flexbox
Want to Learn More?
If you found this helpful and want to learn more about centering in CSS, check out these great resources:
- CSS Tricks: Centering in CSS - One of the best guides out there with lots of examples
- MDN Web Docs: Centering in CSS - Clear explanations from Mozilla's team
- W3Schools CSS Align Tutorial - Try out the code yourself with interactive examples
The Bottom Line
While centering a div used to be a pain point in web development, modern CSS has given us multiple reliable ways to handle it. I usually use Flexbox because it's so intuitive and versatile.
The key is understanding what you're trying to achieve:
- Is it part of the normal document flow?
- Does it need to float above other content?
- Are you dealing with single or multiple elements?
- Do you need both horizontal and vertical centering?
There's no single "best" way to center things - it all depends on your specific use case.
Happy centering!
Related articles

Development using CodeParrot AI

