
Lovable AI: The Ultimate Beginner Guide
Unlock the full potential of Lovable AI with our comprehensive usage guide! Whether you're a beginner exploring lovable AI tutorial options or seeking a detailed lovable AI guide, this blog covers everything you need to get started.

What is Lovable AI?
Lovable AI is an innovative platform designed to transform your ideas into fully functional web applications swiftly and efficiently. By simply describing your concept in natural language, Lovable leverages advanced artificial intelligence to generate applications with aesthetically pleasing designs and robust functionality.
Key Features:
- Rapid Development: Articulate your idea, and Lovable AI delivers an initial version of your application within seconds, significantly accelerating the development process.
- Iterative Enhancement: Engage in a conversational interface to refine and improve your application, allowing for seamless iterations and adjustments.
- One-Click Deployment: Once satisfied with your application, deploy and share it effortlessly with a single click, streamlining the sharing and feedback process.
Problem Solved:
Traditional software development often requires extensive coding expertise, significant time investment, and collaboration among various specialists. Lovable addresses these challenges by democratizing application development, enabling individuals without technical backgrounds to create high-quality web applications efficiently.
Getting Started with Lovable AI
This section is your comprehensive guide to building and deploying your first full-stack application with Lovable. Follow these easy steps to go from creating an account to integrating GitHub into your app.
1. Creating Your Account
Start by visiting the Lovable AI website. Click on the “Sign Up” button to create your account. After completing the registration process, you can log in to access your dashboard. This is where all your projects will be managed.
2. Starting Your First Project
Once you’re logged in, click on the text input and begin by entering a detailed description or prompt outlining your project idea. Lovable AI will process your input and generate the foundational structure for your application, including design and functionality.
3. Customizing Your Project with the Knowledge Base
The Knowledge Base is where you can define your project’s requirements, functionality, and design guidelines. To set it up:
- Navigate to the settings icon on your dashboard.
- Click on the "Manage Knowledge" button, and add in your project guidelines.
- Regularly update these entries to keep your app development aligned with evolving goals.
4. Editing and Refining Your Application
Use Lovable AI's intuitive editing tools to refine your app:
- Undo and Version History: Reverse unwanted changes or revert to a previous version of your app for effective experimentation.
- Select Tool: Edit specific UI components by clicking on them directly. Update text, colors, layout, or functionality as needed.
5. Adding Images and Visuals
Enhance your application by uploading visuals:
- Attach Images to Prompts: Provide images during your prompt creation for better context and accurate outputs.
- Add Images to Your App: Use the built-in editor to upload and place images directly within your app's UI.
6. Integrating GitHub for Code Management
Connect your project to GitHub for seamless code management. This integration allows you to make edits in your preferred IDE and sync them with Lovable. To set it up, just follow the visual guide below.
And just like that we know how to create a new project from scratch and also link it with GitHub!
Useful Tips and Tricks
Using Images
Adding images to your project enhances its visual appeal and improves user engagement.
1. Uploading Images Directly
The simplest way to add images is by uploading them directly in the chat. Here’s how it works:
- Drag and drop an image into the chat window, or select one from your device.
- Lovable AI will automatically analyze the image and determine where it fits best within your project.
- If necessary, specify in your prompt how and where the image should be used (e.g., background, header, or a specific section).
This method is ideal for quick prototyping, as Lovable takes care of the placement automatically.
2. Using External Image URLs
If you have images hosted on external platforms like Unsplash, Imgur, or your own web server, you can reference them using a URL. Follow these steps:
- Find the direct image link from a trusted hosting service.
- In your project prompt, specify where the image should be used. Lovable will fetch and integrate the image accordingly.
Use this image for the homepage banner:
https://upload.wikimedia.org/wikipedia/commons/thumb/7/73/Pale_Blue_Dot.png/442px-Pale_Blue_Dot.png
💡 Note: Some websites restrict external usage through CORS (Cross-Origin Resource Sharing). If the image doesn’t load, try an alternative hosting source.
3. Adding Images via GitHub
For more control over your assets, you can store images in a GitHub public repository and use them in your project. Here’s the process:
Step 1: Connect Your GitHub Repository
- Ensure your project is linked to your GitHub repository.
- This allows seamless syncing between your development workspace and external assets.
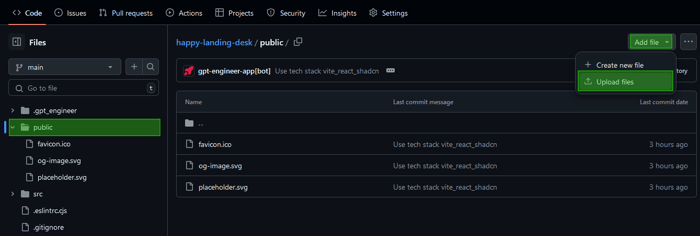
Step 2: Upload Images to the Public Directory
- Navigate to your project’s GitHub repository.
- Locate the public folder (or create one if it doesn’t exist).
- Upload your image by either:
- Dragging and dropping the file.
- Clicking “Add File” > “Upload Files” and selecting the image.
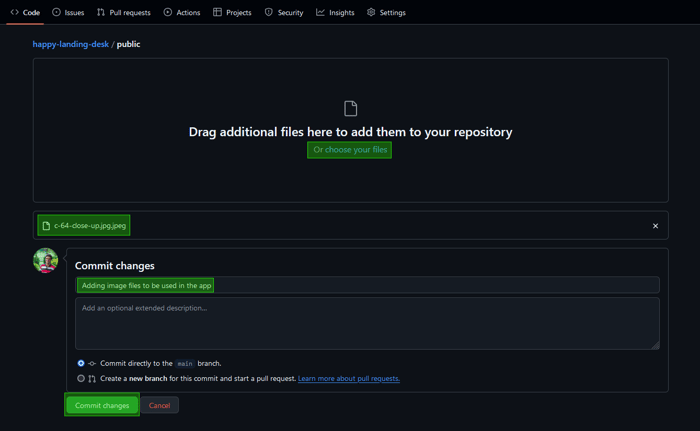
- Write a commit message (e.g., “Adding new images for the homepage”) and click Commit changes to finalize the upload.
Step 3: Retrieve the Image Path
- Open the uploaded image in GitHub and copy its path.
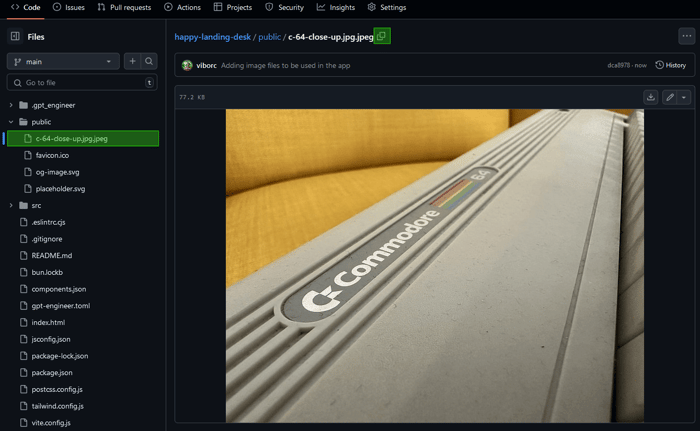
- The path should look something like:
public/my-image.jpg Step 4: Use the Image
Now, reference the uploaded image in your project prompt like this:
Set the hero section background to public/my-image.jpg 💡 Tip: Optimize large images before uploading to prevent slow loading times in Lovable. Also, you can use videos as well, following the same approach.
Using Custom (Google) Fonts in Lovable AI
Typography plays a crucial role in defining the visual appeal of your application. While Lovable AI does not support direct font uploads, you can still use a variety of web-safe and Google Fonts to enhance your project’s design.
1. What Are Web-Safe Fonts?
Web-safe fonts are standard fonts that are pre-installed on most operating systems, ensuring your text remains consistent across different devices and browsers. Since they do not require additional loading time, they improve site performance.
Some commonly used web-safe fonts include:
✔ Arial / Helvetica
✔ Times New Roman
✔ Georgia
✔ Courier New
✔ Verdana
✔ Tahoma
✔ Trebuchet MS
2. How to Use Web-Safe Fonts
Since web-safe fonts are widely supported, you can specify them directly in your Lovable project prompts. For example:
Use Courier New for all headings in the landing page hero section.This ensures that all users see the same font regardless of their operating system or browser. While web-safe fonts provide reliability, they may feel limited in terms of creative design. For more variety, Google Fonts can be a great alternative.
3. Using Google Fonts
Google Fonts offers a vast collection of typography styles that can be easily integrated into projects. You can use Google Fonts in two ways:
A. Specifying a Google Font by Name
If you want to use a Google Font without manually adding a link, simply mention the font name in your project prompt. Lovable will recognize and apply it accordingly.
Example:
Use 'Playfair Display' as the primary font for section titles.This method keeps the workflow simple and does not require additional configuration.
B. Adding Google Fonts via a Direct Link
For more control over how fonts are loaded, you can manually add a Google Font link to your project.
Steps to add Google Fonts via a link:
- Visit Google Fonts and select your preferred font.
- Copy the provided font link.
- Include this link in your prompt.
Example:
Add this Google font: https://fonts.googleapis.com/css2?family=Dancing+Script&display=swap
Apply it to all subheadings in the pricing section.
By using direct links, you can precisely control how fonts appear and load in your app.
Using npm Packages in Lovable AI
Expanding the functionality of your projects is easy with npm packages. While Lovable AI provides robust tools for building web applications, npm allows you to integrate powerful third-party solutions, reducing development time and enhancing your app’s capabilities.
1. What is npm?
npm (Node Package Manager) is the largest package ecosystem for JavaScript, enabling developers to reuse and share code effortlessly. It hosts thousands of libraries that add advanced features to your applications, from UI components to backend utilities.
You can browse available packages at npmjs.com.
2. Why Use npm Packages in Lovable AI?
By integrating npm packages, you can:
✔ Add complex functionalities like authentication, state management, or animations.
✔ Reduce development effort by leveraging pre-built solutions.
✔ Improve maintainability with well-documented and tested libraries.
For example, if you're building a Kanban board application, implementing drag-and-drop functionality from scratch would be time-consuming. Instead, you can use the @hello-pangea/dnd package to quickly achieve this feature.
Example Prompt:
Use the @hello-pangea/dnd npm package to enable drag-and-drop functionality in my Kanban board app.
Ensure users can add, move, and reorder cards within columns.
3. How to Evaluate npm Packages for Your Project
While Lovable provides seamless integration with many npm packages, it does not guarantee compatibility with every package available. Some npm packages may have dependencies, require specific configurations, or introduce unexpected issues when used.
To maximize success, it’s essential to carefully evaluate npm packages before integrating them into your project. Here’s how:
A. Check the Number of Downloads
A widely-used package is generally more reliable. Look at the package’s download statistics on npmjs.com—higher downloads indicate greater trust within the developer community.
B. Verify Maintenance & Updates
Regularly maintained packages are less likely to have security vulnerabilities or compatibility issues. Check:
✔ When the package was last updated.
✔ Whether the repository is active with ongoing improvements.
✔ If it’s compatible with the latest software versions.
C. Read Reviews & Community Feedback
Explore GitHub discussions, issue trackers, and developer forums to understand how the package performs in real-world applications. Look for:
✔ Reports of major bugs or security concerns.
✔ Positive feedback from the developer community.
✔ Official documentation that is clear and well-structured.
Conclusion
This guide walked you through everything from creating your first project to customizing it with images, fonts, and npm packages. We explored editing tools, and GitHub integration ensuring you have all the resources to develop and deploy your app efficiently.
Do check out the official Lovable AI docs for further understanding.
Related articles

Development using CodeParrot AI

